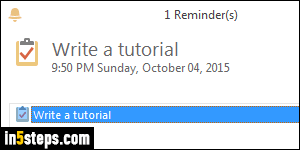
Events you add to Microsoft Outlook's calendar can optionally have a reminder attached. But you don't need to go through the calendar: you can add your own to-do's ("tasks"), and set an optional reminder for a specific day and time. The screenshot shows an example of the reminder popup in Outlook 2016, used for this tutorial. But the steps are the same in Outlook 2013 and Outlook 2010.
In 5 steps
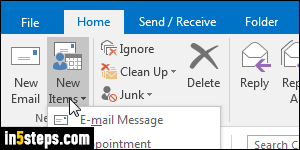
In Outlook, the Ctrl+N keyboard shortcut opens a new type of item which depends on the area in which you are (Emails, Calendar, Tasks, Address book, etc.) So, instead, remember that the following hotkey will create a new task wherever you happen to be in Outlook: Ctrl+Shift+K. You can also add a new task by clicking on the New Items dropdown, and picking "Task" (always under the Home tab of the ribbon: and you can make the ribbon always visible!)
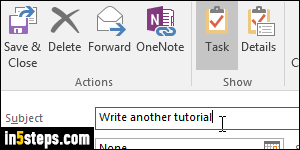
In the new reminder window, type your reminder in the Subject text field: it's the text that will appear in the popup ("Write a tutorial", in my example in the first screenshot). All the other fields are optional. The only thing left to be reminded to take care of that task is to check the "Reminder" checkbox.
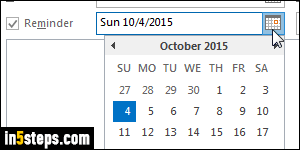
Pick a due date for your reminder. Then, pick a time: this is not necessarily the due time, it's the time at which the reminder popup will open, as long as Outlook is running. The time dropdown only shows half-hour increments, but the time is also an editable text field, so you can type any hours and minutes you want. Once done, click on the Save & Close button (top left corner).
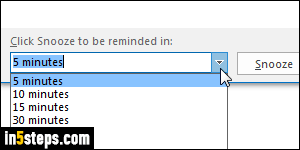
Bonus Tips:
- Just like regular Outlook calendar events, you can snooze task reminders by picking a time span in the dropdown, and clicking on the Snooze button!
- To view all your tasks, click on the clipboard-and-checkmark icon in the bottom left corner of Outlook's main window (keyboard shortcut of Ctrl+4). Your tasks will appear at the bottom; all flagged messages appear at the top. Tasks and flagged emails that have a reminder attach show a bell icon on the right.

