


Outlook Mobile on Apple's iOS operating system or Google Android is nearly identical. In both cases, you can swipe a message left as a quick shortcut to archive that particular email. Swiping right will schedule the email for follow up. Fortunately, these two gestures can be customized to 8 different actions!
In 5 steps
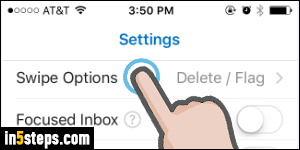
First, launch Outlook Mobile and tap on the Settings button (gear icon) in the bottom left corner. Nearly all available options are under that screen, as opposed to your phone or tablet's centralized settings app. Then, tap on the Swipe Options submenu (I explained earlier the focused inbox option).
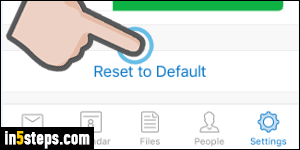
Before going any further, notice in the previous screenshot that the current swipe actions are shown in light gray (in my case, Delete and Flag). And on the setting screen that just loaded, the "Reset to Default" button at the bottom lets you restore at any point the original schedule / archive swiping actions.
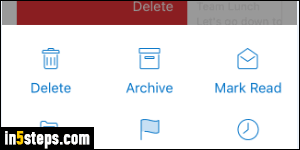
To customize what happens when you swipe from left to right, tap on the Right Swipe button. A popup will open from the bottom of the screen, showing all available actions that can be assigned to that gesture: Delete, Archive, Mark [as] Read, Move (to an email folder), Flag, Schedule, or Read & Archive. To disable that swipe gesture altogether, select "None" (last option shown).
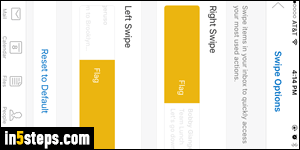
Repeat the same steps for the Left Swipe (what happens when you swipe from right to the left side of your screen). Should you wish to, Outlook Mobile will even let you assign the same action to both swipe gestures! Once done, tap on Mail to return to your messages and test out your new swipe actions.