
On Mac OS X, menus are docked at the top, for iTunes and other windowed applications. On Windows, recent versions of iTunes have hidden the menus, which you now need to access by clicking on a tiny menu icon in the top left corner of the window (screenshot). This saves a bit of screen real estate, but isn't very practical. I'll show you how to restore the classic iTunes menus.
In 5 steps
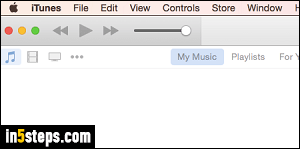
This will also make it easier if you regularly switch back and forth between iTunes on Windows and iTunes on Mac OS X: notice from the screenshot that when menus are showing on Windows (step 4), they're exactly the same as the ones on Mac OS X. Except for the iTunes menu on the Mac: Apple's OS assigns to all apps a namesake menu on the right of the Apple system menu.
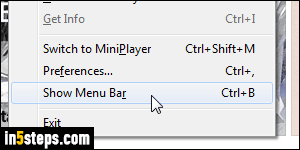
Back to iTunes on Windows, click on the menu button (top left corner). Choose "Show Menu Bar" at the bottom. Notice that you can also quickly toggle the classic menus' visibility by hitting the Ctrl+B keyboard shortcut. Best of all, the menu icon will remain in the top left corner, regardless of the classic menus' visibility. So you can alternate between one approach and the other!
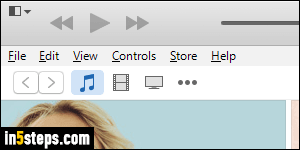
Here's what iTunes now looks like: compare this screenshot with the one in step 2 - that should make things easier! Some letters are underlined on my screenshot because I've enabled underlining shortcut access keys: it's a hint on Windows to show which hotkey pulls down a particular menu, or activate one of its commands. In iTunes, Alt+F shows the File menu, Alt+E for the Edit menu, Alt+V for View, Alt+C for Controls, Alt+S for Store, and Alt+H to display the Help menu - hitting escape (Esc) hides the open menu / submenu.
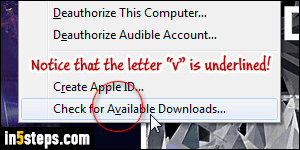
Now that you've restored the classic menus and learned about access keys, here's an illustrative tip ("teaching you how to fish"!) To check if there are any downloads available for your Apple ID, press Alt+S to show the Store menu, and then hit the letter V: this does the same, but way faster, as clicking on the Store menu and choosing Check for Available Downloads at the bottom!

