


Your Twitter username (or "@" handle), determines your URL (web address). What Twitter calls your "real name", which appears in most places, can be changed independently: it's either your first name and last name, your company name for a business account, or a product / brand name. If your change Twitter handle (username), you should update your name to make them match!
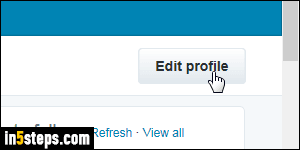
For whatever reasons, Twitter doesn't show your real name in the Settings portion of the site. Instead, login to Twitter and click on the Edit profile button on the right side of the page, just below your header picture at the top.

As soon as you do, the majority of the page will become disabled (grayed out), and some editable text fields appear on the left. The first one (shown on the screenshot), is your displayed name: select and erase that text box's content.
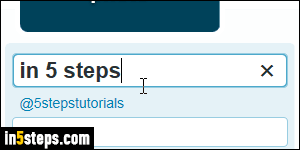
Type your new name / business name / brand name: unfortunately, Twitter doesn't allow internet addresses as name ("Account update failed: Name must not contain URLs"). Double-triple-check for typos. Note that you can also add your URL (website address), bio, and birthday in the other text fields. For brick-and-mortar businesses, consider adding your physical address. Now click on the "Save changes" button on the right (where the Edit profile button was).

Within a second of changing your name, the page will now show everything as normal: notice (and check once more :) that your new name is displayed on the left, plus any other information you decided to add in the other fields! If your logo mentions your name, make sure to update your profile picture as well.