

There are two ways of emailing a picture from Microsoft Outlook: attached to the message, or pasted "inline" (where the image appears in the body of the message, as opposed to an attachment). I'll explain the pros and cons of each approach, and mention a few important caveats with pasting images.
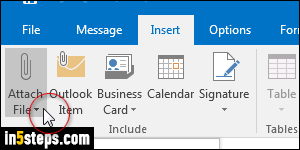
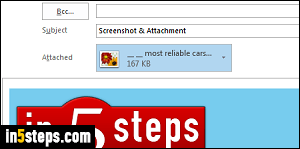
Attaching an graphic is easy, and works like any other file attachment. (By the way, I'm using Outlook 2016 in this tutorial, but all steps also apply to Outlook 2013 / 2010.) In the new message window, click on the Insert tab and the Attach File button. Navigate to the folder that contains your photo, and double-click on it. That's all it takes: your image now appears as an attachment!
To add an image inside your message, open that picture in a graphic editor like MS Paint, or another Office app. Then, copy it from there and paste it in the email. Outlook embeds the image in the message, using "Base64 encoding".
Note: if pasting an image doesn't work (or if the formatting toolbar buttons are disabled / grayed out), you probably just need to enable rich formatting!
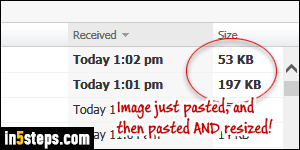
Outlook comes with graphic editing capabilities. Look at the two emails in the screenshot: I pasted a picture: once as-is, and the second time after resizing it in Outlook. (Click on the image and drag its bottom right corner inwards to resize!) Notice that Outlook not only changed the dimensions of the photo, but it also resampled the image, resulting in a much smaller embedded graphic!
There's one case where Outlook won't embed a pasted image: that's if you copied the image from a web browser. In that case, Outlook will reference the image, using its public internet address ("URL"). That's good for message size, but bad if that image is no longer available when you recipient receives the message - no picture will be showing! See the workaround explained below.
Bonus Tip - embedding an image found online: you can force Outlook to embed an image found online (vs. referencing it). Copy the image from the website, and paste it (and even resize it) in MS Paint. Now copy it from Paint, and paste it into your Outlook message: it's now embedded, not referenced!
Bonus Tip # 2: Windows 7 / 10 can auto-resize images sent by email.