


The latest versions of Windows include over 200 fonts, not counting the ones you installed; and each one comes with brand new fonts. Switching to a new PC? Easy: this tutorial shows you how to copy your favorite fonts from one computer to another. Pay attention to a font's licensing terms, and make sure to get your fonts from a legal source, like MyFonts.com (a personal favorite).
In 5 steps
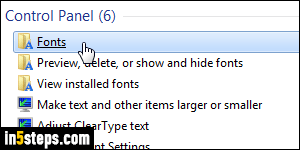
To find the font you want to transfer, click on the start button in Windows 7/10 and type "fonts" in the search field. (In Windows 8, just type "fonts" on the start screen instead.) Then, click on the Fonts folder icon under Control Panel. This opens your system Fonts folder, whose location is "C:\Windows\Fonts". Before Windows 7 / Vista, you could browse that folder like a regular one, in Windows Explorer. Since then, it opens in a special Control Panel screen.
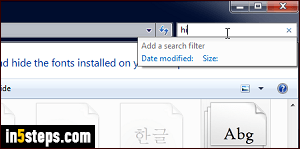
Find the font you want to copy to your other PC: they're sorted alphabetically, but you can also type part of its name in the search box to find them faster. All matches look normal, while other fonts are semi transparent (see screenshot).
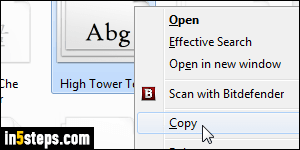
Then, right-click on the font and choose Copy: just like a regular file, you can now paste that file somewhere else (like your Desktop, to easily find it when time comes to transfer it!) Fonts that appear as a stack include several variations (like Black, Narrow, Bold, etc.) In those cases, copying one font will result in multiple files when you paste it (see the next screenshot). That's normal. Just make sure to copy all variants of that font to your new PC.

Repeat these steps as needed, but do check your other PC: most of the fonts on the computer you're using right now are probably already installed on the other. Unless forced by a license, you don't need to uninstall these fonts. Once done, move the font files you just pasted to a USB flash drive or shared/network folder, and copy them from there to another computer. If you need help installing them, see the "Add a font to Windows 7 / 8 / 10" tutorial.

Bonus Tip:
For backup purposes, or if you really have a lot of fonts you'd like to transfer to another computer, you can go the brute-force way and copy the Fonts folder itself! To do that, type "C:\Windows" in the start menu's search field and hit Enter. Find the Fonts folder, right-click on it, and choose Copy: you can now paste it anywhere you like, on the same computer, a USB drive, etc.