

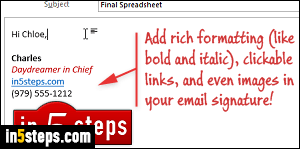
Unlike many email programs, Microsoft Outlook doesn't come with a default signature (something like "Sent from Microsoft Outlook"). But the feature is not only supported, but is one of the most flexible implementations: you can have multiple signatures, automatically associate a signature with one or more email accounts you've added, and create your signature as plain-text (no formatting), or rich-text, which includes bold, italic, underline, links, and even images!
In 5 steps
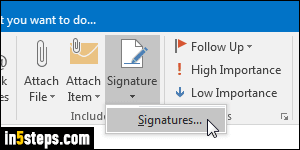
From Outlook's main window, click on the File button (top left), and select Options. Go to "Mail" settings on the left, and click on the Signatures button. You can also access that screen from the email editor (see screenshot).
Note: I took this tutorial's screenshots in Outlook 2016, but the steps are the same in Outlook 2013 and Outlook 2010 (even Outlook 2007, to an extent).
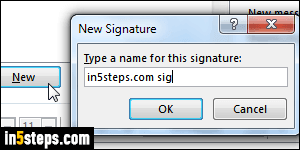
In the Signatures and Stationery dialog that opened, click on the New button to create a new email signature. Type a meaningful name for that signature: for example, the name of the email account with which you want to associate it. That name will appear in the Signature dropdown in the new email window. On the right side, select the email account you want to associate with it.
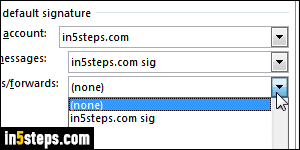
To automatically insert that signature in emails you compose, select it in the New messages dropdown. To also add it when you reply to a message or forward it, select that signature from the Replies / forwards dropdown. Tip: you can create a complete signature for new emails, and a short one for replies and forwards (e.g., one that only includes your name and phone number).
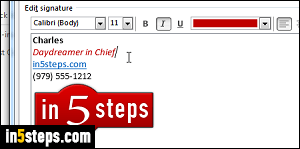
Now type your signature in the text box: it should ideally include all the information needed to get in touch with you, at least for a professional email address. Notice from the screenshot that you can use various text formatting options and font colors. To add a link, paste the URL (internet address) and hit space, or highlight words and hit Ctrl+K to make them a hyperlink. To add a picture to your signature (like a logo), just paste it in the editor, as I did.
Bonus Tip - using pictures in your signature:
If you paste a local image (coming from your computer), it will be embedded inside every message that includes your signature, making it much larger. Instead, consider uploading your image, and copying it from its online location. In this scenario, Outlook won't embed it: it will reference it instead. This means that your emails will no longer include the signature's image as attachment!