


Mac OS X has always had great support for multiple languages: on Windows or Linux, changing your PC's default language can be challenging. Apple made it easy: this tutorial shows you how to optionally add a new language (no download needed!), and change your Mac's language to anything you want.
In 5 steps
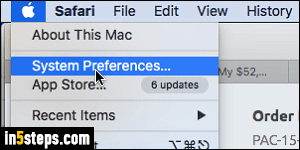
First, click on the Apple menu (top left), and choose System Preferences.
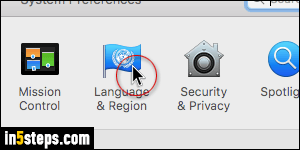
Select the "Language & Region" options (fifth setting in the first row).
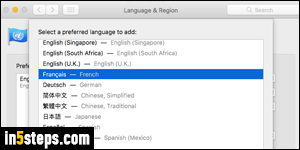
To add a new language, click on the "+" plus sign at the bottom of that list; otherwise, skip to the next step! Find the language (and its regional variation, if any). Select it, and click Add. Since language files are already on your Mac, adding a new language takes no time. Once done, your Mac offers to switch to the new language: stick to your current language, and read the next step.
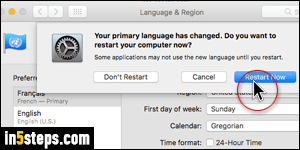
Whenever you're on that screen, your Mac's current, default language is listed first. To change the language Mac OS X uses for your profile (user name), drag the desired language to the top of the list. You may see some changes right away, like the day's date in the menu bar. But the new language won't be fully applied until you reboot your Mac. Do it manually later on, or click Restart Now when you get the "Your primary language has changed" message!