

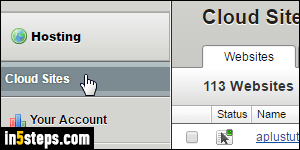
WordPress is one of the platforms Rackspace Cloud Sites supports out-of-the-box, alongside content management systems like Drupal and Joomla. In a few clicks, you'll be ready to launch your newly created WordPress blog: nearly as easy as adding a regular site on Rackspace! Assuming that you've already purchased a domain name for your blog: sign into your Rackspace account, click Hosting > Cloud Sites on the left, and click Add A Site on the right.
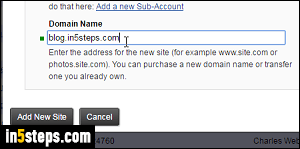
Make sure that the correct sub-account is selected in the dropdown, and enter the full domain name (with or without the "www"), or the full subdomain name, as I did on the screenshot. Now click on "Add New Site" to continue.

Leave "Host as a standard website" checked, and click Continue. On the next screen, select "WordPress" and click Next Step. Rackspace also shows the current version; whenever you log into your WordPress blog, you'll be automatically notified if an update has been released. (Updating your blog to the latest version --critical to keep it secure-- only takes a few clicks!)
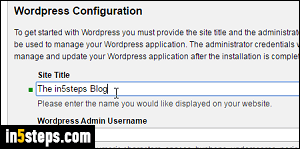
A popup opens to collect specifics about your WordPress blog: site title, admin username (which is public, if you use it to create blog posts: I recommend that you use one set of credentials for the blog administrator, and create another user to post articles). The bottom of the popup form gathers technical info, like database name, database user name, and password. (Use something different for the WordPress Admin Password and the database password!)
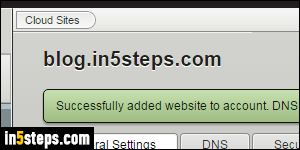
Click on Add New Site: review the last screen's information, and click Finish. Within a few seconds, you should get the green confirmation message shown on the screenshot. If you used a subdomain (as I did), your WordPress blog should be live within a few minutes. If you added a brand new domain for it, it may take up to a day or so for the "DNS" (website location info) to propagate around the world. But you can still start using it right away (see bonus tip).
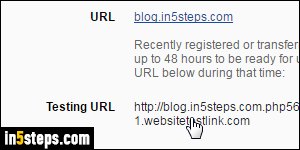
Bonus Tip - Accessing / managing your WordPress blog before it's live:
Rackspace lets you view your new sites with a temporary URL (internet address) before fresh DNS has finished propagating. Under the General Settings tab in the site's control panel, you'll find a link next to "Testing URL": this link works all the time - use it if your blog doesn't yet appear at its URL, or if you have problems reaching it because of DNS or connectivity issues!