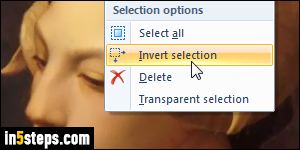
MS Paint includes a "crop" command that lets you to basically create a new image based on the selected area of an original picture. Anything outside the selected area will be, well, "cropped out". All of Paint's selection tools can be used in conjunction with the crop command. If it's easier to select the area you don't want, go right ahead: once you are done, right-click inside the selection, and choose "Invert selection" from the context menu (see screenshot).
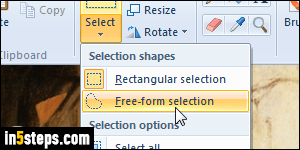
Note that you don't have to use a square / rectangular selection: if you click on the dropdown arrow under the Select button in the Home tab, you can pick the "Free-form selection" tool instead. It lets you select the exact area you're interested in, by surrounding it with an irregular shape. Keep in mind that all picture files are square or rectangular, so the portion of the image not selected will become of a solid color (using "Color 2" as the background color fill).
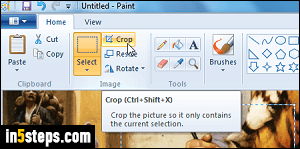
Once you've selected the area, click on the Crop button; you can also hit the corresponding keyboard shortcut of Ctrl+Shift+X. (Hold down the control key and shift keys, and type the letter "X" while holding both of them down.)

Paint will automatically resize the image to match the size of your selection. If you chose a rectangular selection, you can use that picture anywhere you want, it looks "finished" right away. If you chose a free-form selection, the screenshot shows you what the final result might look like for you. In many cases, you'll want to retouch that cropped image to make it look more polished.
Changing your background color:
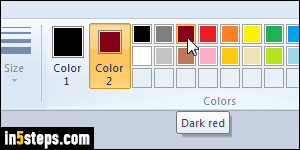
As you can tell from the previous screenshot, leaving the default white background doesn't look great. To change Paint's active background color, select Color 2 in the ribbon. When it is highlighted in orange, click on any other color you like. And to pick a custom color, click on Edit colors on the right! (Just hit Ctrl+Z to undo, and crop again with the new background color.)
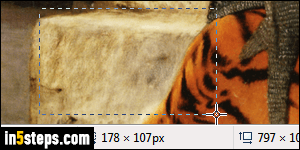
Bonus Tip - crop to a specific size: with a selection tool selected, dragging with your mouse button held down draws an outline (often called marching ants), giving you an idea of the area selected so far. The status bar, at the bottom of the window, shows in real-time the selection's width and height, in pixels. You can then crop to match that exact size. If you don't see the status bar, click on the View tab in the ribbon, and check the Status bar checkbox.

