

With time, Microsoft Outlook has added support for the most popular webmail providers (Gmail, Yahoo Mail, AOL Mail, and of course its own Hotmail / Outlook.com service). But it's still possible to manually setup an email account, so that you can customize everything from scratch. Outlook can automatically add email accounts, but it will partially fail if your email provider does anything different from the norm (like using a non-standard port number).
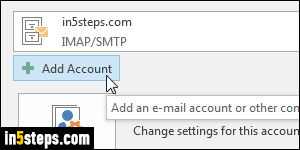
The first time you launch Outlook, the new account wizard automatically opens. To add an email account from within in Outlook, click on the File button (top left corner). Make sure that the Info tab selected on the left. Then, click on the Add Account button on the right. While these screenshots were taken in Outlook 2016, the steps are exactly the same in Outlook 20103 and Outlook 2010.
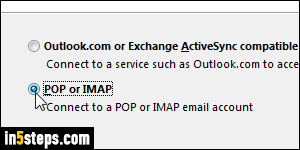
When the Add Account dialog asks for a name and email address, don't enter anything. Instead, select Manual setup or additional server types at the bottom, and click Next. On the next screen, pick POP or IMAP and click Next.
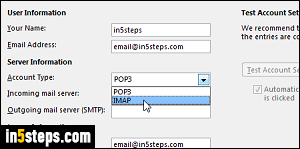
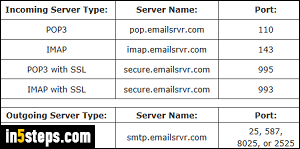
Enter your Name, as you'd like it to appear when you send messages from Outlook: this is your "from / display name". Enter your full Email address in the next field, and select the protocol (POP3 or IMAP). Enter the incoming and outgoing mail servers, which tell Outlook how to connect to the service. Type your User name (your full email address, typically) and your Password.
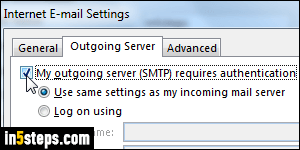
To configure other parameters, click on More Settings on the right: the dialog that opens lets you customize advanced settings, like outgoing authentication, SSL encryption, etc. Click OK to return to the Add Account wizard; double-check everything, and click Next. Outlook will send a test email to that email address (to check your outgoing / Send settings), and check for that message right after (to check your incoming / Receive settings). Click Finish.