

By default, anything you post on your personal timeline or a Facebook page will be published right away, and time-stamped with the current date and time. But, on a Facebook page, you can post something in advance: set it for later, but publish it now, and it will only appear on your page at the future date and time you specified. That's great if you're away on vacation, or if you want your posts to appear during your page's peak traffic time! (You can also backdate posts.)
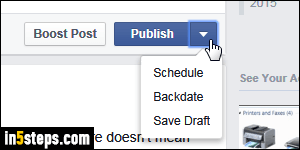
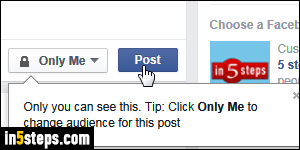
The first screenshot shows the Post button on your personal Facebook page: there are no options. By contrast, this screenshot shows the Post button you get when publishing something on a Facebook page for business. Notice the dropdown arrow on the right of the button: click on it, and you'll get custom scheduling options (and the option to Save Draft for posts you'll resume later).
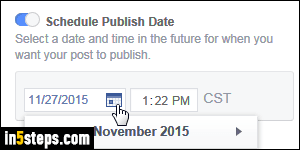
To apply a future date to your post, select the Schedule option: when the Schedule Post popup opens, pick a publishing date. The time, by default, will be the same as "right now", but you can change that. Notice that the time zone is shown: make sure that it is the correct one, or adjust the time accordingly.
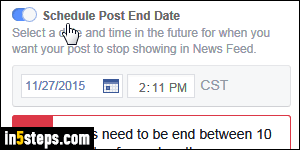
Unless you say otherwise, your post will permanently stay on your Facebook page, like any other one. But Facebook also includes the option to make your post automatically "expire", at which point it will be automatically deleted from your page's timeline. Enable the Schedule post end date option, and pick a date and time. When you are done, double-check your post for typos, make sure that it includes everything you wanted to share, and click Schedule.
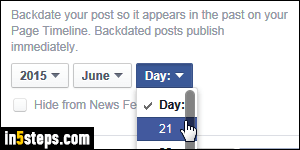
The other option, which helps if you forgot to post something when you should have, is to publish your post for a past date. To do that, click again on the dropdown arrow, but now select "Backdate". Pick a old date, as far back as your page's creation date. Optionally check Hide from news feed: that's useful for things only you want to see on your timeline. Click on the Backdate button: as soon as you do, the post will appear in the proper chronological spot!