

As time passes, your hard drive fills up, Windows 7 / 8 / 10 keeps adding diagnostic files, Windows Update takes up more room with installation files, etc. Before you know it, your disk is running out of space from files you didn't want or even didn't know you had! If you have a small, solid-state drive (SSD), that problem occurs even sooner given how expensive large ones are. "Disk Cleanup" to the rescue: that built-in Windows tool removes all kinds of hard-to-find system files that in some cases are not easy (or safe) to delete.
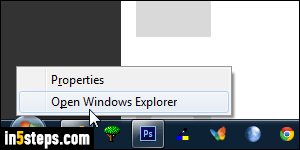
So here's the easiest way to regain hard drive space in Windows: launch Windows Explorer (either hold down the Windows logo key and hit E, or right-click on the start button and choose "Open Windows Explorer"). Make sure that "Computer" is selected on the left, to show all your drives.
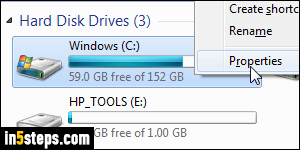
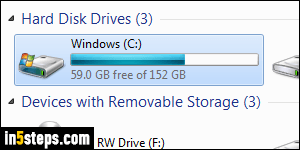
Right-click on your primary / system drive: this is generally the "C:\" drive, but Windows 7 will show its logo above it either way (see screenshot). Choose "Properties" at the bottom of the context menu, and make sure that the General tab is selected in the disk drive properties dialog that opens.
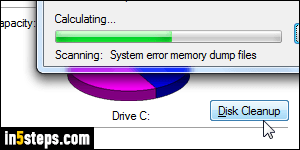
Click on the Disk Cleanup button: depending on the size and type of your hard drive (mechanical / SSD), the process where Windows scans special areas of your disk may take anywhere from a few seconds to a few minutes (gasp!) When the second popup opens, check or uncheck the types of files you want Windows to clean up. Before you click OK though, there's another option to consider if you have the administrator's password and your UAC settings.
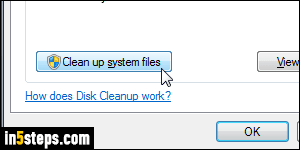
To delete even more old files (and regain sometimes much more disk space), click on the Clean up system files button. This forces the Disk Cleanup tool to look in even more areas to empty unused space. Here too, check or uncheck the types of files you want to get rid of. When you are ready, click OK and go have a coffee break: the disk cleanup process typically takes a few minutes.
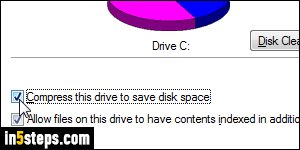
Bonus Tip: if you're seriously running out of space, Windows 7/8/10 offers another option to save disk space. Right-click on the drive that's reaching its maximum capacity, and choose Properties again. This time, check "Compress this drive to save disk space" and before clicking OK. Making your files smaller will help, especially with (highly compressible) text documents.