

By default, Mac OS X only shows a few icons in the menu bar at the top of the screen. To change the sound volume, you need to use your keyboard's volume up / down keys. But you can also change volume with a couple of click of the mouse if you make your Mac display the volume slider in that menu bar.
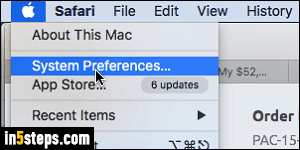
To display that volume slider, click on the Apple menu in the top left corner of the screen, and select System Preferences, as shown on the screenshot.
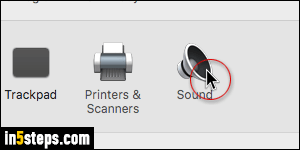
When the Preferences window opens, click on the Sound settings (it's the speaker / woofer icon - last one on the right, in the second row).
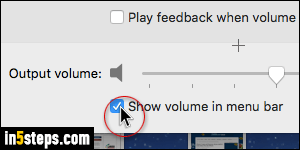
Make sure that the Sound Effects tab is selected at the top, and check the "Show volume in menu bar" checkbox at the very bottom. (Checking the Mute checkbox doesn't affect the volume button: it only mutes your speakers.)
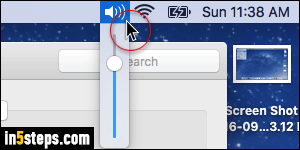
As soon as you do, your iMac or MacBook / Air / Pro will show a speaker icon in the menu bar. Click on it once to show the volume slider (see screenshot). When that slider is showing, you can drag the head up (increase volume) or down (decrease sound, all the way to complete mute). You can also use the Up and Down arrow keys on your keyboard to change the volume. Scrolling up or down (trackpad or external mouse wheel) also will change sound level!
Bonus Tip - keyboard shortcuts to control the volume on Mac OS X:
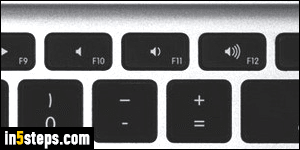
Standard Mac keyboards use the F10 key to mute the sound, the F11 key to decrease it, and the F12 key to increase it (see screenshot). If your Mac was set to use the function keys as F-keys, just hold down the "fn" key in the lower right corner of the keyboard at the same time as the F10 / F11 / F12 keys!